Your goal is to organize and view all of your OCT images in Oculink. Oculink contains one main Catalog that serves as the repository for all of your imported images. You can import images from one to many exported folders into the one main Catalog in Oculink. Each will retain its own identifing information from the original Bioptigen machine. 
*Non-destructive import methods, all original images and original database remain in original location.
**preferred method of import for best performance
Yes. Oculink contains one main Catalog that serves as the repository for all of your imported images.
*Non-destructive import methods, all original images and original database remain in original location.
**preferred method of import for best performance
Not directly at this time. However this will be import option C and will be developed in the future.

After you import your catalog, create a collection and project with the images you want to register and average. Then navigate to File, Project, Actions and select Create Motion Corrected Image Files in Project. The files will generate and you will see a progress bar.
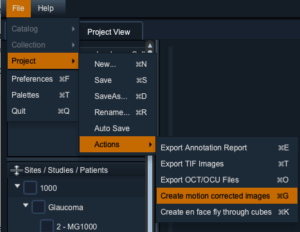
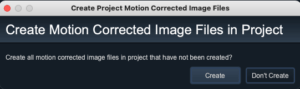
Image averaging and registration is performed using a rigid body cross correlation with three degrees of freedom, an xshift, a zshift and rotation. The motion correction is performed with a z shift only.
The original OCT images are preserved in the location you specify. The new images are stored in the same location, with an addition to the file name that easily identifies it as a Motion corrected file.
File name examples:
Original file name – “MT2000_OD_V_6x6_0_0000524.OCT”
Registered/Averaged and Motion Corrected File name – MT2000_OD_V_6x6_0_MotCor0000524.OCT
Absolutely! You can import a whole exported folder or you can import a whole porter drive at one time.
Not at this time but this feature will be added in the near future.
Your initial import of images creates your base Catalog. Oculink then has options for different groups called Collections and Projects. The organization does not move the original images around, rather creates an organizational structure for you to work with. The original images remain in their storage space that you designate.
Catalog
Collection
Project
Catalog
Collection 1
Collection 2
Project1
Project2
Project3
University Catalog
ACHM OCT Images for PRO 12345
Grader 1
Grader 2
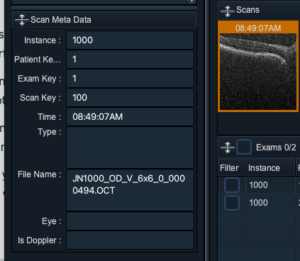
In your project, you click once on an image in the filmstrip of images and the metadata will appear in the scan data panel on the bottom left corner of Oculink.
Not at this time however, Oculink will be available as a cloud application in the future and at that time it will contain PHI control measures.
You create different projects with the same images. Image annotation and markup is saved within that project and not visible in other projects. Oculink is available as a single license for a single installation at this time. Different people may use the same computer or you may purchase additional licenses for Oculink.
OCT videos at this time, additional video types will be available in the future.
Perform the function to create the enface fly through cube for your project. Then you can set your image viewing preferences to view the motion-corrected OCT and the fly through cube at the same time. When you double click on an image thumbnail both images will appear in the main panel. See this video for instructions on how to create the en face images.
Yes in the right side panel is an option to flip the image either horizontally, vertically or both.
On the right side panel is an option to adjust the brightness and contrast. Use the hand icon to first select an image. Then use the side handles of the brightness and contrast graphic display and move them to the left or right. The image will adjust as you move the handles.
The scale bar will appear on the image by clicking a toggle option in the right hand side. This is a future feature.
Use the line annotation tool to draw lines on the images. The length data will be recorded and available to view in the edit window for the line and in the exported annotation report. Right click the line to open the edit line window. Here you can name the line and view the captured length and xy location data. 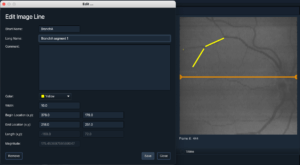
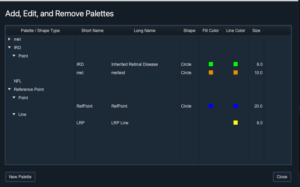
You can create a palette of custom annotations for reuse. Go to the File, Palettes menu item. From here create a new palette where you can add custom lines and points. Once a palette is created it is available for adding to a layer on an image.
Perfect. Oculink’s annotation report will give you exactly what you want. Once each grader has completed their annotation, they export the report to a .csv. You can then view all the data for each image.
Yes, you can export images as TIF files or the original OCT/OCU files. Select your project. Filter any images you would like to filter using the color, picked or rating filters. Then click the export button (either TIF or OCT/OCU). The images will be stored in your export directory.
Yes, you can export the original OCT/OCU files. Select your project. Filter any images you would like to filter using the color, picked or rating filters. Then click the export OCT/OCU button. The images will be stored in your export directory.
Future Feature! Coming soon.